

A temporary delivery code should grant access only for the delivery, then be removed or allowed to expire. Setting up temporary access codes for delivery services means creating a separate code with the shortest practical access period, sharing it only with the intended recipient, and reviewing or deleting it afterwards. Avoid obvious choices such as 1234.
It’s easy to focus on convenient entry and overlook how a code is shared. A safer routine keeps the code private, labels it clearly so you can identify it later, and removes access once it’s no longer needed. The steps below explain how to create and schedule a code using the controls your lock supports, share it securely, and review access afterward, including options for guests and one-time PINs.
Key Takeaways
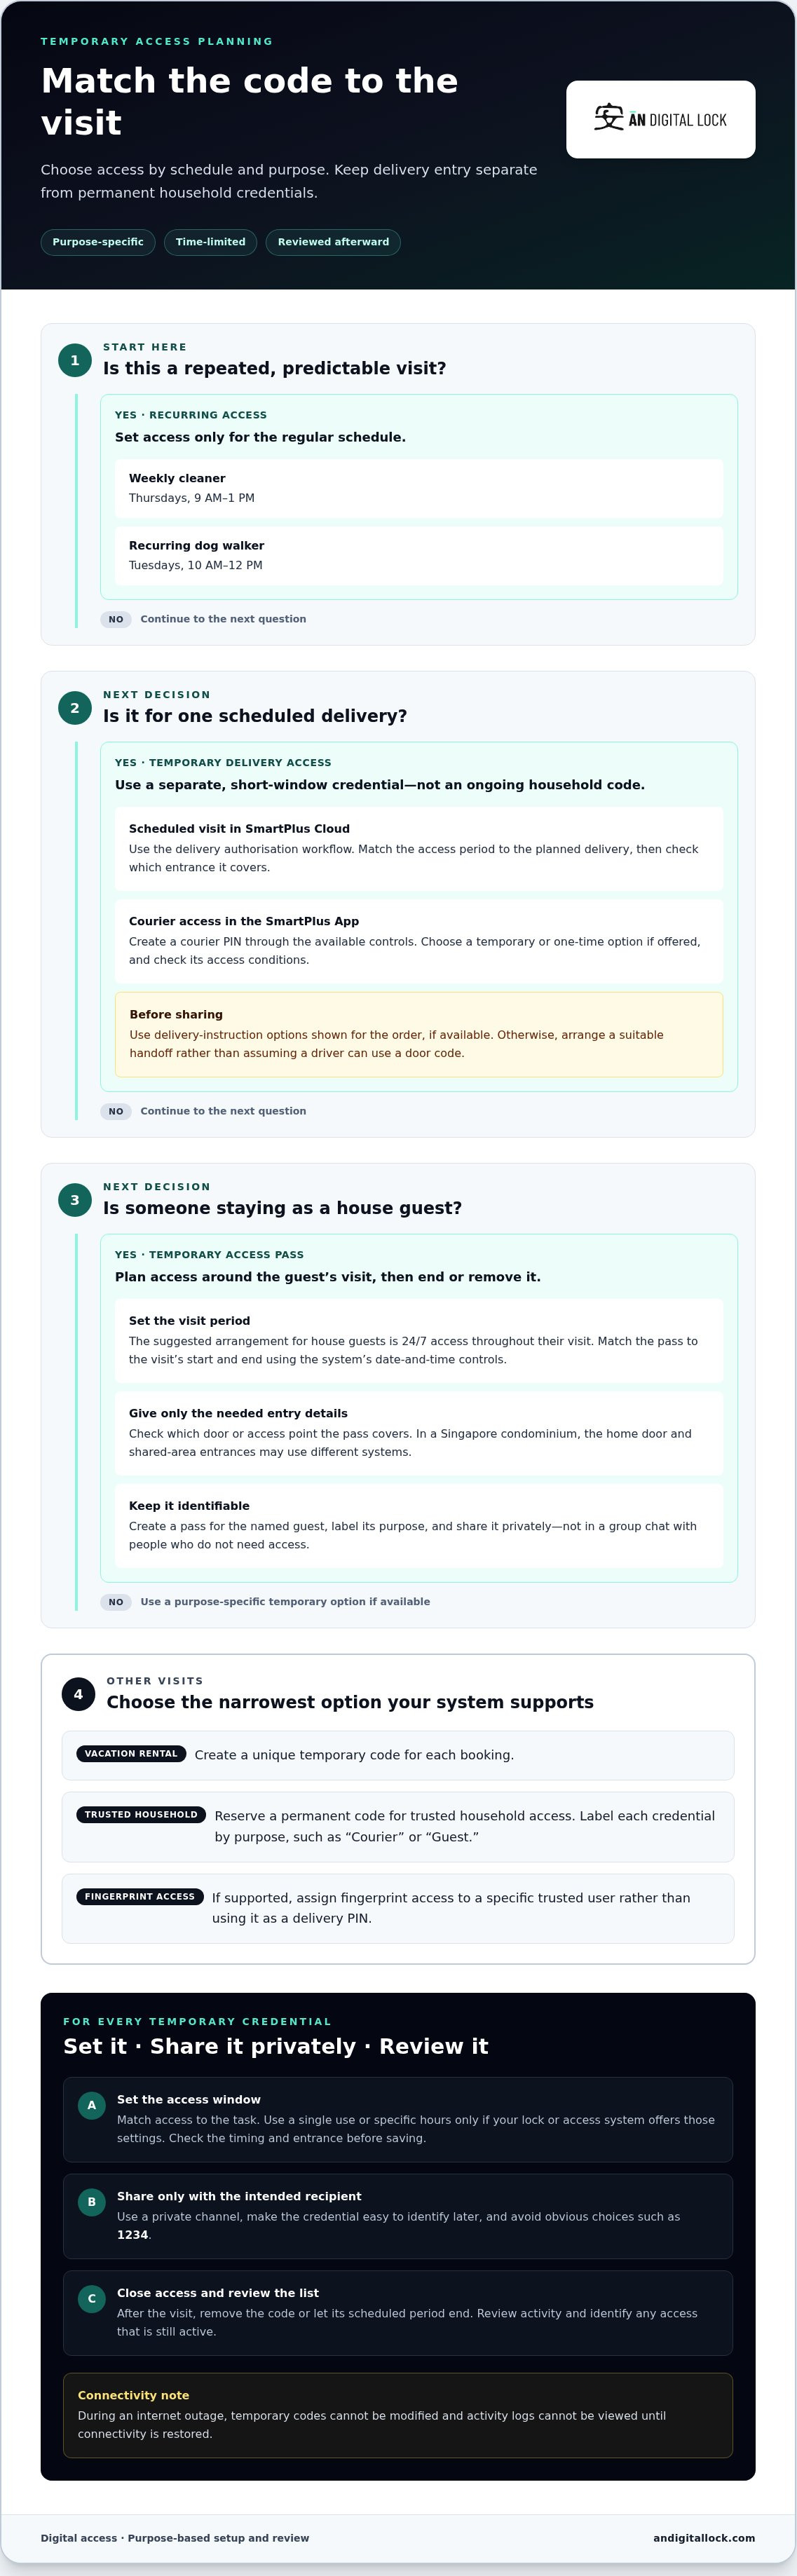
- Match the code type to the visit: use recurring access for regular schedules and a unique temporary code for each booking.
- Set access windows around the task, such as Thursdays from 9 AM to 1 PM for a cleaner or Tuesdays from 10 AM to 12 PM for a dog walker.
- For house guests, plan access for their visit and remove or end it when they leave.
- Name codes clearly and review activity so you can identify which access is still needed.
- Share codes privately, avoid obvious choices such as 1234, and remember that code changes and activity logs may be unavailable during an internet outage.
Creating permanent, recurring, duration, and one-time PIN codes
Choose a code type that fits the visit, set its access period, and review how it can be shared. Keep a delivery code separate from permanent household access.
For Singapore homes, a PIN for your unit door won’t provide entry through a separate condominium gate or lobby. Follow the building’s access process and any applicable household arrangements before sharing entry details.
A temporary code gives a visitor access for a defined purpose or period. Depending on the lock or access system, it may recur, expire after a set duration, or work only once.
To set one up, open your lock or access system’s code controls, choose an available code type, set its timing, and save it. For a scheduled delivery, match access to the delivery window rather than granting ongoing entry.
Delivery-service options vary by service and order. Use the delivery-instruction options shown for the order, if available. Otherwise, arrange a suitable handoff rather than assuming a driver can use a door code.
Limit access to certain hours or a single use only if your lock or access system offers those settings. Check the code’s conditions before sharing it.
-
Create a Delivery Authorisation
In SmartPlus Cloud, use the delivery authorisation workflow for a scheduled visit. Set the access period to match the planned delivery, then check which entrance it covers before saving. Don’t treat delivery authorisation as permission to enter shared areas unless it covers them. Keep it separate from permanent household credentials.
-
Create a Courier PIN Code
In the SmartPlus App, create a courier PIN through the available courier access controls. Choose a temporary or one-time option if your setup offers it, and match its timing to the delivery. Review the PIN’s access conditions before sharing it. Don’t reuse a courier code for unrelated visitors or future bookings.
-
Create a Temporary Access Pass
Create a Temporary Access Pass for a person who needs access during a visit. For house guests, the suggested setup is 24/7 access throughout their visit. For deliveries, use a narrower window when the system allows it. End or remove the pass when it is no longer needed, rather than leaving guest access active.
- Set recurring access only for a repeated, predictable visit. For example, a weekly cleaner could have access Thursdays from 9 AM to 1 PM, while a recurring dog-walker code could work Tuesdays from 10 AM to 12 PM. Create a unique temporary code for each vacation-rental booking.
- Reserve a permanent code for trusted household access. Label each credential by purpose, such as “Courier” or “Guest,” so you can identify it later. If the system supports fingerprints, assign fingerprint access to a specific trusted user rather than using it as a delivery PIN.
During an internet outage, you can’t modify temporary codes or view activity logs until connectivity is restored. Plan code changes and reviews with this limitation in mind.
Temporary Access Pass access for guests
Use a separate guest credential for a planned visit. Set its purpose and access period, and decide how you’ll remove it before sharing.
- Decide who needs access. Create a Temporary Access Pass for a named guest, such as a relative staying at your home. Keep it separate from permanent household credentials. A clear purpose makes a guest credential easier to identify and manage. Don’t share one pass among unrelated visitors if you need to track who received access.
- Set the visit period. For house guests, the suggested arrangement is 24/7 access throughout their visit. Match the pass period to the visit’s start and end, using the date-and-time controls available in your system. If the guest arrives earlier or leaves later, adjust the planned period rather than leaving access open indefinitely.
- Choose the right entrance and method. Identify which door or access point the pass covers. In a Singapore condominium, the home’s door and shared-area entrances may use different systems. Give the guest only the entry details needed for the visit, and explain which entrance to use. Don’t assume a pass for one door opens another.
- Share the pass privately. Send the Temporary Access Pass directly to the intended guest through a private channel. Add a clear label, such as “Guest access for your stay,” so it’s easy to distinguish from other credentials. Don’t post access details in a group chat with people who don’t need them. Keep any instructions relevant to the guest’s visit.
- Review and close access after the stay. When the guest leaves, remove the pass or let its scheduled access period end, depending on the available controls. Review the access list to identify any guest credential that remains active. If plans change, update the pass before its original end time. A clear removal routine prevents old access from being mistaken for current permission.
- Keep a simple access record. Note the guest’s name, the pass purpose, and the visit dates in a private household record. For example, “Aunt Mei, guest stay, planned visit dates” is more useful than an unexplained entry such as “Pass 2.” Use a record you can access when needed, and avoid storing PIN details alongside names where others could easily see them.
Date-and-time conditions
Set a start and end time around the delivery, then check the time zone and expiry setting before saving.
Keep a delivery code active only for the planned delivery window, allowing enough time for the expected handoff. If the timing changes, adjust the window or create a new authorisation.
-
Set the Date and Time Conditions
Enter the access start and expiry using the controls on your lock or access system. Check whether the displayed time uses Singapore local time or another zone. An example expiration condition is 2020-07-01 at 00:00 UTC. Treat that as an example format, not a date to reuse. Confirm the date, time, and zone before saving.
-
Choose How Long the Code Remains Active
Set the code to cover the delivery window, not the whole day by default. The right duration depends on the scheduled arrival and handoff method. For a parcel expected during a defined slot, use that slot as your guide. Remove access after delivery so the code doesn’t remain active beyond its purpose.
- Set the start time before sharing. Check the scheduled arrival details, then choose the earliest time access is genuinely needed. If the code starts too early, it grants access before the delivery window. If it starts too late, it may not work if the courier arrives early. Check the start time against the delivery instructions.
- Choose a clear expiry point. Set an end time after the planned handoff, rather than leaving access open-ended. Check whether the system asks for a calendar date as well as a time. For example, an expiry at midnight may fall on the next calendar date. Review the full date and time together before confirming.
- Update the schedule when plans change. If the delivery is delayed or rescheduled, adjust the code’s access period when possible. Otherwise, end that authorisation and create a new one for the revised delivery. This keeps the active window aligned with the current plan instead of an outdated schedule.
- Check whether access repeats. A recurring schedule is useful for repeated visits, while a one-time delivery needs a single access period. Review the repeat setting before saving. If the code repeats by mistake, access may remain available on later dates. For a single parcel, make sure the schedule doesn’t create extra access windows.
- Review the saved settings. Reopen the code details and compare the displayed start time, expiry, and time zone with the delivery plan. Check that the code is assigned to the intended entrance. Correct any date or time-zone errors before sharing. This final review catches scheduling mistakes that checking the PIN alone won’t reveal.
The example’s expiration value is 2020-07-01T00:00:00.000Z. Read the date and time as one condition, and compare the complete value with the intended cutoff before saving. Keep the expiration tied to the delivery’s planned access window, and verify that the saved condition ends at the intended point rather than leaving access active beyond the handoff.
Naming, tracking, and reviewing codes
Give each delivery credential a clear label, then review its status and activity record.
- Name each code by purpose. Use a label such as “Courier delivery” or “Parcel handoff,” not an unexplained entry like “Code A.” A clear name distinguishes delivery access from guest or household access. Keep labels brief, specific, and easy to recognise in the lock’s access list.
- Add a delivery reference when useful. If your system allows longer labels, include a recognisable delivery detail, such as “Parcel for kitchen.” Don’t add sensitive personal information. The label should help you identify the code quickly, not store private order details in an access record.
- Record who the code is for. In a private household record, note the intended recipient or delivery purpose. For example, write “courier access for parcel handoff” beside the code label. Keep this record separate from the PIN, so someone reviewing the list can understand the credential without seeing its entry details.
- Check the active-code list. Open the access-management screen and compare each delivery label with the deliveries you’re expecting. Look for codes that no longer match a planned handoff. Remove or disable obsolete access when the system allows, rather than leaving old credentials mixed with current ones.
- Review activity after a handoff. If your system provides an activity log, check entries associated with the delivery code and compare them with the planned delivery. Look for unexpected activity or an access attempt outside the intended window. Don’t assume the log identifies a person beyond the details it displays.
- Keep a simple review record. Note when you reviewed the access list and what you did, such as “Courier code removed after handoff.” This gives household members a clear record when they share access-management duties. Keep the notes private, and don’t leave the PIN somewhere easily visible.
- Review after schedule changes. If a delivery is postponed or cancelled, check the matching code and its status. Update or remove access to reflect the current plan. If you create replacement access, give it a distinct label, such as “Rescheduled parcel.”
- Plan for connection interruptions. During an internet outage, temporary codes can’t be modified and activity logs can’t be viewed until connectivity is restored. Once the connection returns, review the affected delivery entry and update its status. Keep a private note of any planned changes you couldn’t make during the outage.
Sharing temporary delivery access codes
A shared code may reach unintended people or allow entry beyond the delivery point. If a code is shared, misused, or stops working, disable or remove it, review available activity records, then arrange a replacement or another handoff method.
-
Consider Access Risks
Before sharing a code, decide which door the courier needs to access. A unit-door code may not open a condominium lobby or shared gate. Don’t grant broader access than the delivery requires. Since recipients could pass the code on, share it only with the intended courier for that delivery.
Check the access period and destination together. A code that remains active after a parcel handoff creates unnecessary access. Don’t use a household PIN or an obvious temporary code such as 1234. If the delivery instructions can’t identify a secure handoff point, choose an alternative that doesn’t expose entry details.
-
Share the Temporary Access Code
Send the code directly to the intended recipient in a private message. Include a clear instruction, such as “Use this code at the unit entrance for today’s parcel.” Share only the entrance information they need. Don’t post the code in a public note or broad group chat where others could copy it.
Before sending, check the code and delivery details: confirm the entrance, recipient, and active period. If a relative or household member is coordinating the delivery, send the code to that person rather than forwarding it widely. Remove a temporary code after a visiting relative leaves, and remove delivery access when its purpose ends.
- Use delivery instructions carefully. Enter only the access information needed for the handoff in the delivery service’s designated instructions. Don’t add a permanent household code to an order note. If the service doesn’t offer a suitable private method, arrange another handoff rather than putting a reusable PIN in a message visible to multiple people.
- Respond if a code is shared. If someone forwards the PIN, treat it as exposed. Disable or delete that code, then create a replacement with a new access period. Don’t simply resend the same PIN privately. Review available activity logs for entries linked to the credential, and note any access you don’t recognise.
- Handle a failed code without widening access. Confirm the courier has the right digits and entrance instructions. Check whether the access period has started or expired. If the code still fails, disable it and arrange a direct handoff or a new temporary credential. Don’t resolve a failed entry by sharing a permanent household code.
- Review after the handoff. Remove the delivery credential when it’s no longer needed, then check that its status reflects the change. During an internet outage, temporary codes can’t be modified and activity logs can’t be viewed until connectivity is restored. Review the affected access after service returns.
AN Digital Lock: Digital Door Locks
AN Digital Lock offers Digital Door Locks for homeowners considering a change to their entrance setup. If scheduled deliveries have prompted you to review how people enter your home, consider whether your current door and lock suit your access needs. Wooden Doors and Metal Gates are also available for entrance projects where the door or gate itself is part of the decision.
Choose a setup that suits your home, then manage delivery access using the code options your lock supports. A Digital Door Lock doesn’t replace checking shared-building entry arrangements, so keep condominium or building access instructions separate from your home’s door code.
Contact AN Digital Lock to discuss Digital Door Locks for your home.
Make your next delivery easier to manage
Use your next scheduled delivery to establish a routine that suits your home and household. Decide who will handle the handoff, where access instructions belong, and how you’ll manage the credential after delivery. A clear routine makes setting up temporary access codes for delivery services part of a considered home-entry plan, not an afterthought.
If your current entrance or lock makes delivery access difficult to manage, consider whether a different setup would better suit your needs. The right choice depends on your home’s entrance and the access arrangements you want to use. Contact AN Digital Lock for access help and explore an option that works for your home.
Frequently Asked Questions
How to create a one-time or time-limited door code for a delivery in Singapore?
Setting up temporary access codes for delivery services starts in your lock’s app or keypad settings. Create a temporary credential, then select single use or enter its start and expiry times. Add a label such as “parcel handoff” to distinguish it from household access. In a Singapore condominium, a home-door code may not open shared building areas. Review the saved settings before arranging the delivery.
How to share a temporary access code securely with a delivery driver?
Secure sharing is essential when setting up temporary access codes for delivery services. Send the code directly through a private channel connected to the delivery, with only the entrance instructions the driver needs. Avoid public notes and broad group messages. If you send it to the wrong recipient, disable it and create a replacement. Keep the code out of messages accessible to unrelated people.
Are there Singapore building, condo, or landlord rules about giving delivery drivers access codes?
A unit-door PIN does not itself provide entry through a separate condo gate or lobby. Follow the building’s access process and any applicable tenancy or household arrangements before sharing entry details.